Entretien de site web — Qu’est-ce que la maintenance d’un site Web ?
L’entretien de site web consiste à maintenir et à améliorer la performance,…

Dans cet article, nous verrons comment utiliser Google reCAPTCHA V3 et V2 pour protéger un site web contre les pourriels. Le but de ce petit guide sera surtout d’expliquer comment ajouter un captcha sur un formulaire. Nous allons également voir comment le Captcha V3 fonctionne. Enfin, nous discuterons des types de captchas et des raisons pour lesquelles V3 est préférable aux autres versions.
En effet, pour appliquer ce guide sans encombre, vous devrez:
Vous pouvez protéger votre site web avec Google reCAPTCHA V3 en suivant juste quelques étapes. Dans cette partie, nous allons détailler ces dernières.
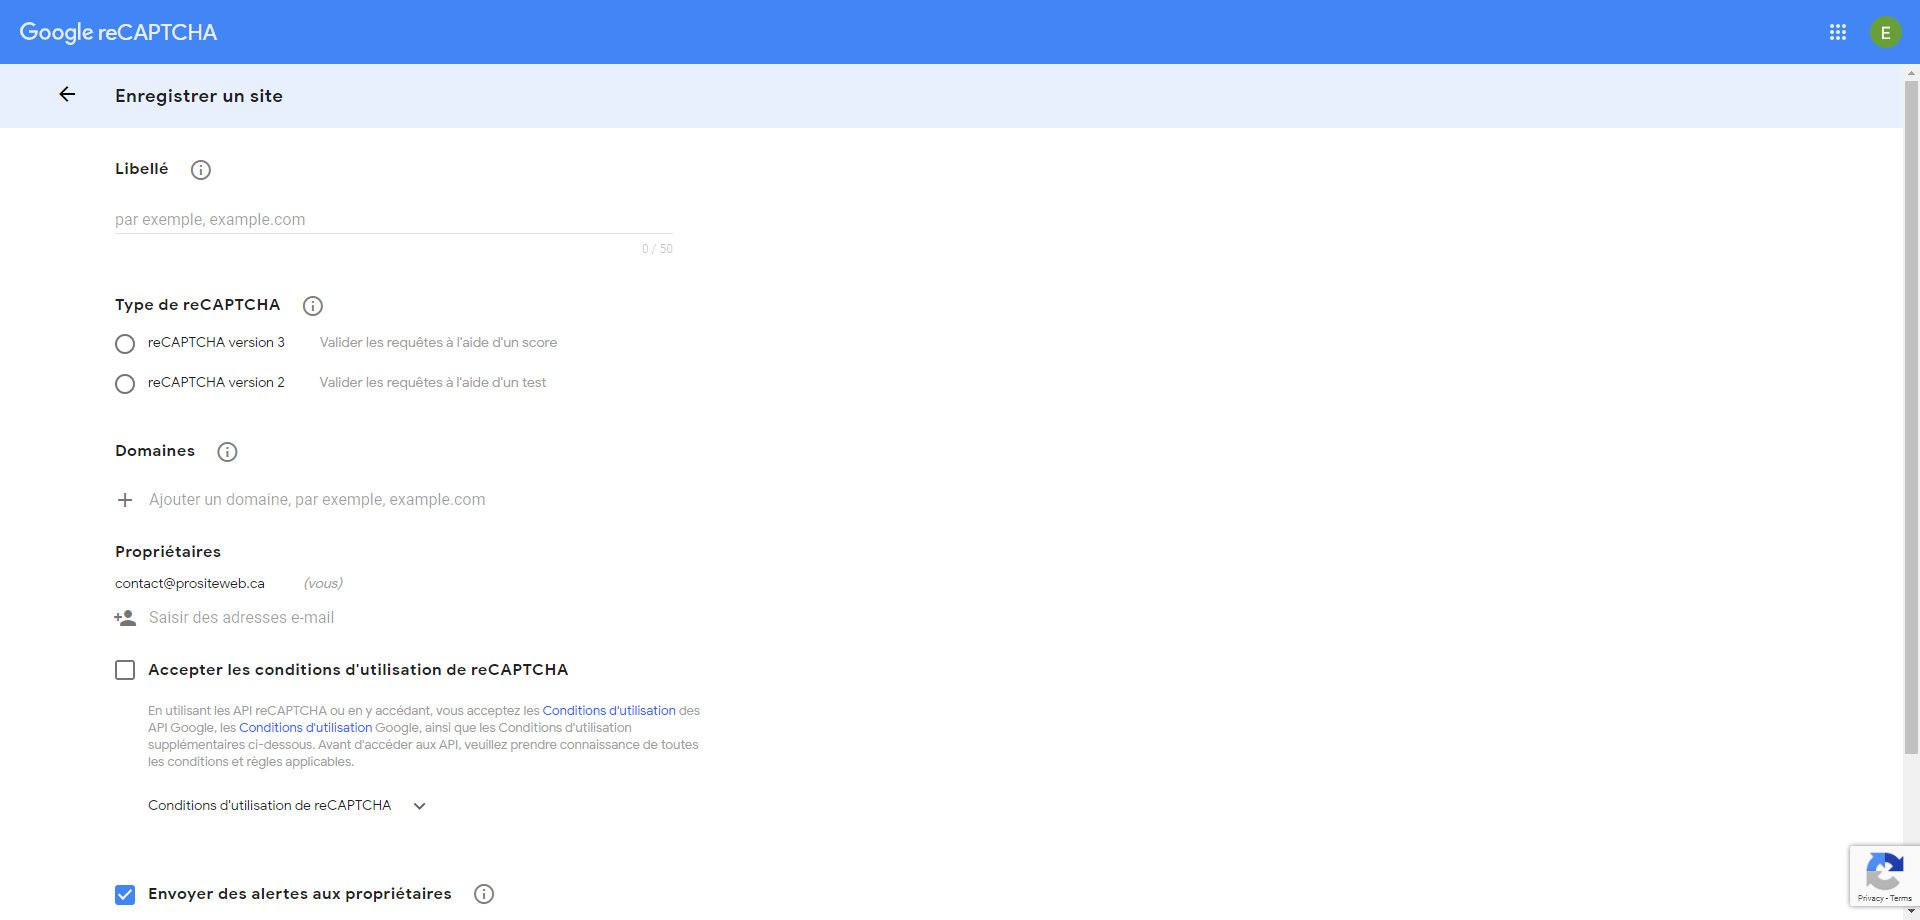
Pour être capable d’utiliser le Google reCAPTCHA V3, vous devez avant tout enregistrer votre site sur la plateforme Google reCAPTCHA. Veuillez noter que pour enregistrer un site, celui-ci devrait être publié sur le net. Voici les étapes à suivre :

Pour la suite, nous allons utiliser un formulaire de contacts HTML que nous avons créé. Cependant, cela est juste à titre d’exemple. Notez que vous pourrez être en mesure d’ajouter le catcha sur n’importe quel formulaire que vous créerez.
Sur notre formulaire de contact HTML, nous allons ajouter un champ caché appelé « reponsecaptcha». Ce champ vise à détecter si l’utilisateur est un humain ou robot.
Pour commencer, voici à quoi pourrait ressembler le code du formulaire initial.
<!DOCTYPE html>
<html lang="en">
<head>
  <title>Envoyer un message</title>
  <meta charset="utf-8">
  <meta name="viewport" content="width=device-width, initial-scale=1">
  <link rel="stylesheet" href="https://maxcdn.bootstrapcdn.com/bootstrap/4.5.0/css/bootstrap.min.css">
</head>
<body>

<div class="container">
  <h2>Send an SMS</h2>
  <form action="envoyer.php" method="POST">
    <div class="form-group">
      <label for="email">Nom et Prénom</label>
      <input type="tel" class="form-control"  placeholder="Nom et Prénom" name="firstlastname">
    </div>
    <div class="form-group">
      <label for="pwd">Email</label>
      <input type="email" class="form-control"  placeholder="Adresse Courriel" name="youremail">
    </div>
    <div class="form-group">
      <label>
         Votre Message
      </label>
      <textarea  class="form-control" placeholder="your message" name="yourmessage"></textarea>
    </div>
    <button type="submit" class="btn btn-primary form-control">Envoyer le message</button>
  </form>
</div>
</body>
</html>
Code 1 – Code initial sans le champ de captcha
Après ajout du champ caché et d’autres paramètres, on aura alors un formulaire semblable à celui ci-dessous
<!DOCTYPE html>
<html lang="en">
<head>
  <title>Envoyer un message</title>
  <meta charset="utf-8">
  <meta name="viewport" content="width=device-width, initial-scale=1">
  <link rel="stylesheet" href="https://maxcdn.bootstrapcdn.com/bootstrap/4.5.0/css/bootstrap.min.css">
</head>
<body>

<div class="container">
  <h2>Send an SMS</h2>
  <form action="envoyer.php" method="POST">
    <div class="form-group">
      <label for="email">Nom et Prénom</label>
      <input type="tel" class="form-control"  placeholder="Nom et Prénom" name="firstlastname">
    </div>
    <div class="form-group">
      <label for="pwd">Email</label>
      <input type="email" class="form-control"  placeholder="Adresse Courriel" name="youremail">
    </div>
    <div class="form-group">
      <label>
         Votre Message
      </label>
      <textarea  class="form-control" placeholder="your message" name="yourmessage"></textarea>
    </div>
     <input type="hidden" name="reponsecaptcha" id="recaptcha">

    <button type="submit" class="btn btn-primary form-control" name="envoie">Envoyer le message</button>
  </form>
</div>
<script src="https://www.google.com/recaptcha/api.js?render=LA_CLE_DE_VOTRE_SITE"></script>
    <script>
        grecaptcha.ready(function () {
            grecaptcha.execute('LA_CLE_DE_VOTRE_SITE', { action: 'contact' }).then(function (token) {
                var recaptchaResponse = document.getElementById('recaptcha');
                recaptchaResponse.value = token;
            });
        });
    </script>
</body>
</html>
Code 2 – Code final avec le champ de captcha v3
Après avoir suivi toutes ces consignes, vous devrez normalement voir apparaître l’icône de Google reCAPTCHA V3 dans le coin droit et en bas de votre site. Cela signifie tout simplement que le captcha est activé. Toutefois, in n’est pas encore fonctionnel.
Nous verrons par la suite comment gérer l’envoie des informations.
Gérer les données côté serveur consistera tout simplement à :
Nous allons créer un fichier PHP qui nous permettra de récupérer les données soumises par l’utilisateur. Le fichier pourrait avoir des informations semblables aux données ci-dessous :
<?php // Vérifier si le formulaire a été soumis
if(isset($_POST['envoie']) && isset($_POST['reponsecaptcha'])) {

    // Connecter à Google avec les clés
    $recaptcha_url = 'https://www.google.com/recaptcha/api/siteverify';
    $recaptcha_secret = 'VOTRE_CLE_SECRETE';
    $recaptcha_response = $_POST['reponsecaptcha'];

    // Décoder les informations récupérées
    $recaptcha = file_get_contents($recaptcha_url . '?secret=' . $recaptcha_secret . '&response=' . $recaptcha_response);
    $recaptcha = json_decode($recaptcha);

    // Effectuer une action en fonction du score obtenu.
    if ($recaptcha->score >= 0.5) {
        // Envoyer le couriel
    } else {
        // Vous n'avez pas vérifier si l'utilisateur est un humain ou un robot. Affichez le message d'erreur.
    }

} ?>Veuillez noter que le code PHP fait appel à la fonction file_get_contents, qui n’est pas forcément supporté par tous les serveurs pour des raisons de sécurité ou tout autres raisons. Dans ce cas, une bonne alternative serait d’utiliser la fonction CURL, qui est fortement recommandée. Alors, en remplaçant file_get_contents par CURL, le code ci-dessus deviendra :
<?php // Vérifier si le formulaire a été soumis
if(isset($_POST['envoie']) && isset($_POST['reponsecaptcha'])) {

    // Connecter à Google avec les clés
    $recaptcha_url = 'https://www.google.com/recaptcha/api/siteverify';
    $recaptcha_secret = 'VOTRE_CLE_SECRETE';
    $recaptcha_response = $_POST['reponsecaptcha'];

$ch = curl_init();
curl_setopt($ch, CURLOPT_URL,$recaptcha_url);
curl_setopt($ch, CURLOPT_POST, 1);
curl_setopt($ch, CURLOPT_POSTFIELDS, http_build_query(array('secret' => $recaptcha_secret, 'response' => $recaptcha_response)));
curl_setopt($ch, CURLOPT_RETURNTRANSFER, true);
$capcharespo = curl_exec($ch);
curl_close($ch);
$Reponse = json_decode($capcharespo, true);

    // Effectuer une action en fonction du score obtenu.
    if ($Reponse['score'] >= 0.5) {
        // Envoyer le couriel
    } else {
        // Vous n'avez pas vérifier si l'utilisateur est un humain ou un robot. Afficher le message d'erreur.
    }

} ?>La version 2 propose une case à cocher pour valider si un utilisateur est un robot ou physiquement présent sur votre site web. Dans l’éventualité où vous préfèreriez la version 2, oici la procédure à suivre:
La principale différence entre Google reCAPTCHA V2 et V3 est au niveau de l’approche. En effet, le reCAPTCHA V2, effectue un test avec des images à identifier et la version 3 se sert d’un score.
Dans ce qui suit, nous verrons les ajustements à faire dans le code 2 pour la version 2 de reCAPTCHA.
Dans les lignes de code suivantes, nous illustrons à quoi devrait ressembler votre code. Il est important de remarquer la ligne avec le code ci-dessous.
<div class="g-recaptcha" data-sitekey="VOTRE_CLE_PUBLIC"></div>
Votre code final devrait ressembler à ceci :
Remarque: Nous ne sommes plus revenus sur l’enregistrement du site ou la création des clés. Notez que pour inclure vos clés du reCAPTCHA V2, vous devez avoir sélectionné la version 2 lors de la création des clés.
Il n’y a pas une différence majeure dans la façon de gérer la version 2 et 3. Pour la version 3, vous êtes obligé de définir un score acceptable pour votre site web. Tandis que pour la version 2, l’information retournée sera vide s’il y a échec.
reCAPTCHA v3 est la dernière version proposée par Google pour assister dans la protection des sites web contre les courriels indésirables. De plus, contrairement à la version 2 qui ajoute une case à cocher «Je ne suis pas un robot», la version 3 n’ajoute pas de champ supplémentaire sur le formulaire. Cela a pour résultat une réduction du nombre de clients qui pourraient ne pas réussir les tests. La version «Je ne suis pas un robot» (V2) s’avère potentiellement frustrant si le visiteur ne parvient pas à résoudre l’énigme pour une raison quelconque.
Vous devez absolument prendre conscience que, pour une cause quelconque, la version 3 pourrait se tromper dans l’évaluation du score. Dans ce cas, si le problème résulte en un score en permanence inférieur à la norme, un visiteur pourrait avoir de la difficulté à utiliser votre solution.
Vous pouvez également utiliser les fonctionnalités WordPress par défaut pour protéger les formulaires de commentaires WordPress contre les pourriels. De plus, si vous combinez cela avec des reCAPTCHA, vous aurez l’esprit tranquille concernant la gestion de votre blog. En effet, une mauvaise configuration de la section des commentaires de votre site web peut être la cause de plusieurs failles de sécurité. Alors, utiliser les fonctionnalités intégrées de WordPress et ajouter un reCAPTCHA afin d’éviter les pourriels s’avère être une manœuvre efficace. Pour en savoir plus sur les fonctionnalités WordPress ou nos extensions pour intégrer reCAPTCHA ou toute autre fonctionnalité dans votre site, contact-us.


Loosen the threshold slightly when warranted, fix fragile integrations (minified scripts, SPAs/modals), and reserve visible challenges for gray areas. Always offer a support path .
No. Adjust by form type (contact, signup, support). Start “reasonable,” observe your scores, then refine.
First, opt for an invisible and lightweight solution (e.g., Turnstile). The goal is to avoid friction and only trigger a visible challenge when in doubt.
Yes. Assess the legal basis and, if necessary, load the script after consent . Favor data-friendly solutions and document your choice in the privacy policy.
Prepare a kill-switch : temporarily allow or switch to a simple challenge, while maintaining server-side control (rate limiting, validations).
V3 is suitable when you want frictionless control and an actionable score. V2 is useful as a one-off challenge for ambiguous cases, not as a default barrier.
Proceed in stages: deployment in pre-prod , mobile testing and private browsing, then a small percentage of traffic in production with monitoring of metrics (residual spam, false positives, latency).
Depending on the solution and your context, yes sometimes . When required, load the script after consent and provide an alternative route (honeypot, server validations) to avoid blocking the sending.
Yes, if they are integrated into a layered defense and configured correctly. On their own, they show their limitations; used with server validation, anti-abuse rules, and monitoring, they remain relevant.
Avoid. This creates conflict and does not improve protection. A gradual path with a single solution is better, plus a targeted challenge if necessary.
The bare minimum: action, result, possible score, timestamp, anonymized metadata. Keep the duration short and justified (e.g. 30 to 90 days) to diagnose and optimize.
Nous utilisons des cookies pour améliorer votre expérience. Politique de confidentialité

 on WordPress: A Complete Guide for Entrepreneurs and Developers")
Gilblas is a senior entrepreneur and developer with around 13 years of experience, deeply involved in the WordPress community. He helps SMEs grow through custom web solutions and training. He stands out for his ability to automate and industrialize website creation through Phoenix Forge.