")

How to Replace WooCommerce Add to Cart Button with Form Link (With and Without Extension)

How to Replace WooCommerce Add to Cart Button with Form Link (With and Without Extension)
Look at how to replace the WooCommerce add to cart button with a link to a form, without and with the use of a plugin.
If you’re using WooCommerce, there may be times when you want to not require payment and instead change the add to cart button to direct customers to a form. This is completely impossible with the default configuration. In this case, you must modify the code of your website, or alternatively, install an extension that allows you to accomplish this task. In this article, we propose to explain the process to you.
Who is this tutorial for?
Here we are particularly addressing developers who do not want to use an extension. However, if you don’t have any coding knowledge, stick around. Indeed, in your case, you can contact us for customization. Furthermore, if you’re tempted to do it yourself with a plugin, we’ve developed a free one on GitLab. This plugin will make the changes to the code, and you will only have to configure it, as we will explain below.
How to use the recommendations below
If you have some notions about PHP development, two options are available to you to implement our advice. The first is simply to copy the code and paste it into your current theme’s functions.php file. The second option is to create a PHP file, copy the code into it, and finally use the include or require function to load it by executing the functions.php file.
What you will be able to achieve at the end of this tutorial
By following this tutorial to the letter, you will be able to perform the following actions on your site:
- Give an option to a store admin to enable or disable the add to cart button.
- Display a custom button to replace the “add to cart” button.
- Customize the text to explain to users what to do.
- Display a form in a modal form containing the customer’s choice
Note: Here, you customize your code to achieve your goal. In this context, we will make all the modifications in the functions.php file of the installed theme. We are also going to present you with an extension applying the same codes, thus making it possible to do the same work. Whatever the case, make a backup of your if before any manipulation.
Make adjustments to your WordPress theme
Here, we show you how to add code to your current theme via the function.php file to customize your site.
Steps required to complete the customization process
The tutorial is divided into three (3) main steps to follow, which are as follows:
- Create a custom feature to enable or disable the “add to cart” button.
- Add additional information to the single product page.
- Disable the “Add to cart” field
Step 1 – Create a meta box to control button activation
The following code allows you to create a meta post to enable or disable add to cart from the product page.
Indeed, with code, you create an additional field just below the one for creating and modifying products. Here are some comments to understand it better. That said, in this code,
- prosite_option_paiement is the unique identifier of the field you want to add
- “Add Extra CSS per Product & Disable Add to cart” is the title of the field. Alternatively, you can use the loco translate extension to do the translation
- show_your_cart_box is a function that helps to add additional form fields. Of course, we will define it later.
- product is the post type (WooCommerce actually uses product as the post type key). If you want the meta box to appear in other post types, you can use a PHP array with the list of post keys. Visit this link to learn more about meta boxes.
Show_your_cart_box is a callback function that displays our form fields from the meta box. Here, you will notice that it is the name of this function that appears in add_to_cart_box.
The save_cart_box_meta function, meanwhile, allows you to save information during the modification or addition of a product. With these three functions, you will therefore have additional information below each modification or addition of a product. You will have, for example, something similar to this image.
 Eventually, the combination of these codes will give you the following PHP code:
<?php

function add_to_cart_box() {
    	add_meta_box(
    		'cart_box_meta_box', // $id
    		'Add Extra CSS per Product & Disable Add to cart', // $title
    		'show_cart_box_meta_box', // $callback
    		'product', // $screen
    		'normal', // $context
    		'high' // $priority
    	);
    }
    add_action( 'add_meta_boxes', 'add_to_cart_box' );

    function show_your_cart_box() {
    	global $post;
    		$meta = get_post_meta( $post->ID, 'cart_box', true );


    		?>

    	<input type="hidden" name="your_meta_box_nonce" value="<?php echo wp_create_nonce( basename(__FILE__) ); ?>">

        <!-- All fields will go here -->
  <p>
    	<label for="cart_box[checkbox]">Do you want to disable the add to cart button? (It will be replaced with a contact us link)</label>
    	<br/>
    	<?php
    	if(!empty($meta['checkbox']) && $meta['checkbox']=="no") {
    	    ?>
    	 <input type="radio" id="no" name="cart_box[checkbox]" value="no" checked> No
    	 <br/>
    	 <input type="radio" id="yes" name="cart_box[checkbox]" value="yes" > Yes
    	 <br>
    	 <?php
    	}elseif(!empty($meta['checkbox']) && $meta['checkbox']=="yes") {
    	      ?>
    	 <input type="radio" id="no" name="cart_box[checkbox]" value="no" > No
    	 <br/>
    	 <input type="radio" id="yes" name="cart_box[checkbox]" value="yes" checked> Yes
    	 <br>
    	 <?php
    	} else {
    	     ?>
    	 <input type="radio" id="no" name="cart_box[checkbox]" value="no" checked> No
    	 <br/>
    	 <input type="radio" id="yes" name="cart_box[checkbox]" value="yes" > Yes
    	 <br>
    	 <?php
    	}
    	 ?>
    </p>


      <p>

    	<?php
    	if(!empty($meta['checkbox']) && $meta['checkbox']=="yes") {
    	      ?>
    	      <label for="cart_box[message]">Message for visitors to display on the product page.</label>
    	<br/>
    	<br/>
    	 <input type="text" id="message" name="cart_box[message]" value="please call or make an appointment for more information" style="width: 100%" >
    	 <?php
    	}
    	 ?>
    </p>
    	<?php }

    	function save_cart_box_meta( $post_id ) {
    	// verify nonce
    	if ( !wp_verify_nonce( $_POST['your_meta_box_nonce'], basename(__FILE__) ) ) {
    		return $post_id;
    	}
    	// check autosave
    	if ( defined( 'DOING_AUTOSAVE' ) && DOING_AUTOSAVE ) {
    		return $post_id;
    	}
    	// check permissions
    	if ( 'page' === $_POST['post_type'] ) {
    		if ( !current_user_can( 'edit_page', $post_id ) ) {
    			return $post_id;
    		} elseif ( !current_user_can( 'edit_post', $post_id ) ) {
    			return $post_id;
    		}
    	}

    	$old = get_post_meta( $post_id, 'cart_box', true );
    	$new = $_POST['cart_box'];

    	if ( $new && $new !== $old ) {
    		update_post_meta( $post_id, 'cart_box', $new );
    	} elseif ( '' === $new && $old ) {
    		delete_post_meta( $post_id, 'cart_box', $old );
    	}
    }
    add_action( 'save_post', 'save_cart_box_meta' );
Step 2 – Add additional information to the product page.
Now let’s create a filter that will help add text and a button on the product page. (Client side). With this code, you will make a button appear on your product page with the message you see in the code.
<?php

// Add custom link in product single next to add to cart button
add_action( 'woocommerce_single_product_summary', 'login_button_on_product_page', 30 );
function login_button_on_product_page() {
    global $product;
    global $post;
    $meta = get_post_meta( $post->ID, 'your_fields', true );
    if(!empty($meta['checkbox']) && $meta['checkbox']=="yes") {   // Show or hid
    $link = get_permalink(get_page_by_path('contact-us'));
    $messs="";
    if(!empty($meta['message'])) {
         $messs=$meta['message'];
    } else {
         $messs="please call or make an appointment for more information";
    }
    ?>
    <div class="need-style btncustom">
        <p>
            <?php echo $messs; ?>
            </p>
    <?php
    echo '<button type="button" data-default_text="Login" data-default_icon="sf-icon-account" class="ask-button custom-contact" onclick="window.location=\'' . esc_attr($link) . '\'"><i class="sf-icon-account"></i><span>Contact us</span></button>';
    ?>
    </div>
    <?php
    }
}
?>
Step 3 – Disable the “add to cart” field
At this level, we can create a conditional field to hide or show fields, modify the “add to cart” button as well as add additional information to the product page. Next, we will create a code to disable the “add to cart” fields. The code below helps you achieve this.
<?php
// Remove add to cart button in product single page
// define the woocommerce_before_main_content callback
function action_woocommerce_before_main_content( ) {
    global $product;
      global $post;
    $meta = get_post_meta( $post->ID, 'your_fields', true );
    if(!empty($meta['checkbox']) && $meta['checkbox']=="yes") {
    remove_action( 'woocommerce_single_product_summary', 'woocommerce_template_single_add_to_cart', 30 );
    }
};
// add the action
add_action( 'woocommerce_before_main_content', 'action_woocommerce_before_main_content', 10, 2 );
?>
If you follow the product elaborated above, after activating the custom link, then you should have a product page similar to this.
Changed the “Add to Cart” button to a custom link from an extension.
One of the advantages of plugins is that they are completely independent of the WordPress theme. Indeed, with an extension, you can change themes without having to redo the same work. Thus, we offer you our plugin which you can download for free to accomplish the same work. The plugin applies the codes we presented above. Therefore, you won’t have to modify your site’s code yourself. In addition, we have added some additional information to it. For example, via our plugin, you will be able to:
- Select the page where you want to send the data
- Edit texts with Loco Translate
- Receive an email from the customer containing their data and preferences.
How does it work?
After downloading the extension, go to setting ⇒ Custom product link. So, you can
- select the page where you want the form to appear,
- and add email addresses where customer data should be sent
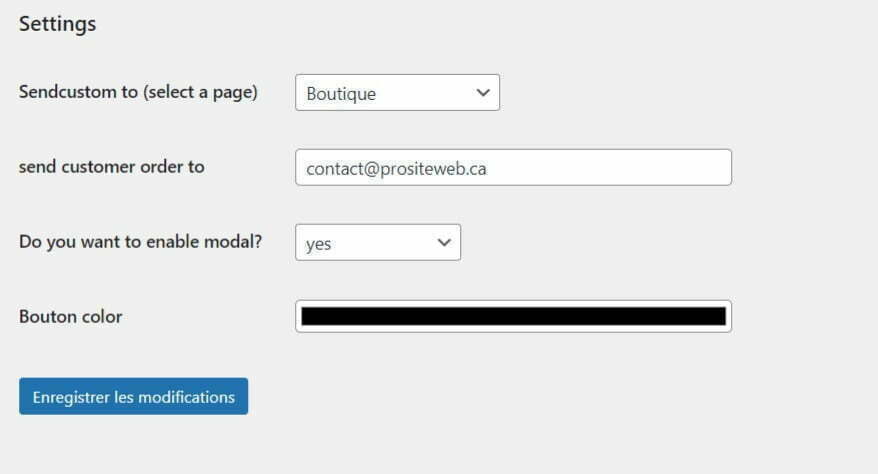
Once you have completed the configuration, consult the pages of your products on which you wish to have a personalized link and validate with a Yes.
This will be enough to see the button appear on your product page. We hope our tutorial helped you achieve your goal. We have many tutorials available to you. To achieve this, follow our blog. However, if you have any questions or would like to request our assistance for your project, contact us. We would be delighted to assist you.
